
This photo is what started it all.
The wheels had started to turn in our minds about renovating our guest bathroom and one of the big things I wanted to change was our sink. Only problem - the bathroom, as small as it is, had a pedestal sink and couldn't hold much more than that.
Researching all over the internet, I couldn't find anything ready-made that I liked. Even remotely.
This vanity from Home Depot was the only thing I found that I liked:

But, I have to admit, I'm a square kind of girl. The round bowl bothered me. On top of that, the $329 price tag bothered me. I knew I could do better.
Then, I saw the sewing cabinet on Craigslist and a light bulb went off. I texted the seller and after a few days back and forth, things withered on the vine. The situation seemed sketchy and they stopped responding when I asked if I could pick it up.
I wasn't going to give up that easy. I then started searching the whole city for sewing cabinets. Couldn't be that hard, right? Apparently there was a horror film shooting in town and they had bought up all the cabinet as props for a scene. Posting my plight on our neighborhood message board, a neighbor confirmed, "Hey! I met an actor from the movie at a bar last night and asked her about the sewing cabinets. She said that they had bought them all and showed me a picture of the scene where they are being used!"
Waamp waamp...
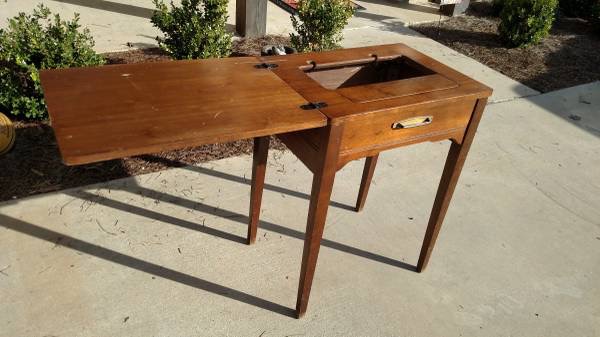
I collected myself and decided to try the salvage market. Guess what I found in the back corner under dust and piles of old wood? A beautiful sewing cabinet.

After a little haggling, I get it home for $60. Not too shabby, considering I was ready to shell out $329.
Now knowing my dimensions, I began doing research on square vessel sinks. I realized I couldn't have the type of sink where the faucet was behind the sink, but integrated into the vessel because of space. I chose this sink (similar) - great price and included the faucet.

One afternoon I sanded and stained the piece. Immediately the cabinet looked better. The wood was just thirsty! The next morning I used Minwax Polycrylic Protective Finish in satin - layered every two hours, doing four coats in total.
We dry fit the sink and the hallelujah chorus rang out!

We showed our contractor where we wanted the sink positioned on the cabinet (toward the back so the water lines would not show out the back) and he took it home and cut the lines for the drain and supply lines.
Getting it into the bathroom a few days later, I couldn't have been more excited. A little adhesive caulk on the desk and a little finagling with fittings, the sink was close to being installed.

You won't see it here, but we had another big, "What are we going to do?" moment. You see, the sink didn't come with water supply lines and being naive, we thought we could walk into a big box store and buy them. Big mistake! When you buy a vessel sink, the fittings are European (read: metric). We needed an M10 line, so I scrambled back to Amazon. Prime, for the win! This is what I purchased. We also learned while installing that we would have to cut a small section out of the back for the cut off valves. A little work with a saw later, we were in business.

The sink area is my favorite feature of the guest bath reno. Truly, no one else has what we have! There's something special about that. (Can we also have a moment of silence for my excitement to have a dual flush toilet?)


Lighting, mirror and other small details have gone up and we can't be any happier with the space!
Another amazing story!! You both "take the cake." MaMaw
ReplyDelete